เครื่องวัดน้ำฝน กับ ESP32 และ YF-S201
เจอกันทุก ๆวันหยุดสัปดาห์ กับ SamongIOT หนึ่งในทีมงาน สมองไทยแลนด์
วันนี้มานำเสนอ โครงการ weather station เพื่อจะเป็นฐานข้อมูลการพยากรณ์น้ำท่วมในพื้นที่นั้น ๆ กัน
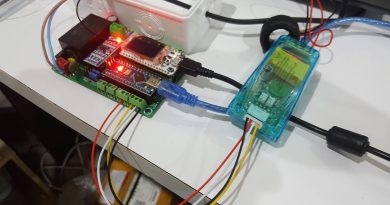
โดยโครงการนี้เราจะใช้ ESP32 สำหรับการวัด สภาพบรรยากาศ คือ วัดอุณหภูมิ วัดความชื้นและวัดปริมาณน้ำฝน โดยมีอุปกรณ์ประกอบดังนี้
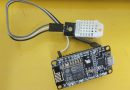
- Am2301 ที่จะใช้เป็นเครื่องวัดอุณหภูมิและวัดความชื้น
- Flow Sensor YF-S201 ที่จะมาประยุกต์เป็นตัวปริมาณน้ำฝนที่รวบรวมผ่านกรวยลงมาอีกครั้งหนึ่ง
- กระบอกพลาสติครับฝน ขนาดเส้นผ่าศูนย์กลาง 10 cm
- ท่อสายยาง
- ESP32
- กล่องพลาสติค สำหรับการติดตั้งอุปกรณ์
เทคนิคการวัดอุณหภูมิ เรากล่าวกันไว้แล้วในตอนก่อน ในตอนนี้จะมาดูการวัด flow น้ำด้วย ESP32 ร่วมกับ YF-S201 โดยสาระสำคัญของเรื่องนี้คือการใช้ประโยชน์จากขา Interrupt ของ ESP32 ซึ่งยอมรับว่าจัดมาให้เยอะแยะจริงๆ โดยเราจะเผื่อเอาไว้ใช้ในการวัดทิศทางลม และความเร็วลมในโอกาสต่อไป ในตอนนี้จะว่ากันเฉพาะการวัด flow น้ำก่อน


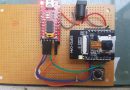
การต่อสาย Sensor YF-S201 ไปยัง ESP32
- 3V3 สายสีแดง
- GND สายสีดำ
- GPIO18 สายสีเหลือง
ส่วนโค้ดนั้น จะใช้การวัดสัญญาณ Interrupt ที่ขา GPIO18 ซึ่ง ESP32 สามารถใช้ขา IO ทุกขาเป็น Interrupt ได้ซึ่งเป็นจุดเด่นที่สำคัญของ ESP32
เทคนิคที่สำคัญในครั้งนี้ คือ การอ่านขา Interrupt ของ ESP32 ที่จะต้องทำการหยุดอ่านขยะที่ทำการเชื่อมต่อสัญญาณเพื่อส่งไปยัง Server (ซึงปัญหานี้ ไม่เจอในกรณีการใช้การเชื่อมต่อ Ethernet
สำหรับโค้ด ก็ตามนี้เลย ขอขอบคุณเวบไซต์ และ github ที่มีโค้ดตัวอย่างให้ศึกษา
โดยในโค้ดนี้ จะมีตัว sensor วัดอุณหภูมิ วัดความชื้นเข้ามาด้วย
/*
 *  This sketch sends data via HTTP GET requests to data.sparkfun.com service.
 *
 *  You need to get streamId and privateKey at data.sparkfun.com and paste them
 *  below. Or just customize this script to talk to other HTTP servers.
 *  Set board NodeMCU-32S pr ESP32 Dev Module
 *  Set Programmer AVRISP mkll
 */
//===== AM2301 - DHT21 setting
// Unified Sensor Library Example
// Written by Tony DiCola for Adafruit Industries
// Released under an MIT license.
// Depends on the following Arduino libraries:
// - Adafruit Unified Sensor Library: https://github.com/adafruit/Adafruit_Sensor
// - DHT Sensor Library: https://github.com/adafruit/DHT-sensor-library
// Use 3V3 GIOP 2 ESP32 Dev Module
// Programmer AVRSIP mkll
#include <Adafruit_Sensor.h>
#include <DHT.h>  // กรณีนี้ต้องใช้คู่กันกับ  DHT_U.h
#include <DHT_U.h>
#define DHTPIN  2 // Pin which is connected to the DHT sensor.
// Uncomment the type of sensor in use:
//#define DHTTYPE   DHT11     // DHT 11
//#define DHTTYPE   DHT22     // DHT 22 (AM2302)
#define DHTTYPE   DHT21     // DHT 21 (AM2301)
// See guide for details on sensor wiring and usage:
//   https://learn.adafruit.com/dht/overview
DHT_Unified dht(DHTPIN, DHTTYPE);
uint32_t delayMS;
//=========
#include <WiFi.h>
//======
 //====
const char* ssid     = "Arsenal2019_2.4G";
const char* password = "xxxxxxxxxx";
const char* host = "xxxxxx.com";
const char* code = "xxxxxxxxx";  // code ของ device
const char* dID = "xxx";
float temp_0 = 0;
float humid_0 = 0;
float vHumidity = 0;
float vTemperature = 0;
float data1=15;
float data2=33;
float data3=33;
float data4=140;
float data5=200;
float data6=33;
float data7=33;
float data8=33;
float data9=33;
float data10=33;
float data11=33;
float data12=33;
float data13=33;
float data14=33;
float data15=33;
float data16=33;
float data17=33;
float data18=33;
float data19=33;
float data20=33;
float cone_diameter =10;
float cd = cone_diameter;
float rainmmhr = 0;
// Credit:
// - https://diyhacking.com/arduino-flow-rate-sensor
// - http://www.instructables.com/id/Flowmeter-NodeMcu-Counting-Litres/
#include <Arduino.h>
#include <EEPROM.h>
#define USE_SERIAL Serial
#include <WiFi.h>
// Variable init
const int buttonPin = 2; // variable for D2 pin
const int ledPin = 7;
char push_data[200]; //string used to send info to the server ThingSpeak
int addr = 0; //endereço eeprom
byte sensorInterrupt = 18; // 0 = digital pin 2
// The hall-effect flow sensor outputs approximately 4.5 pulses per second per
// litre/minute of flow.
float calibrationFactor = 4.5;
volatile byte pulseCount;
float flowRate;
unsigned int flowMilliLitres;
unsigned long totalMilliLitres;
unsigned long oldTime;
void rain_sensor_setup() {
    Serial.begin(115200); // Start the Serial communication to send messages to the computer
    delay(10);
    Serial.println('\n');
    //WiFiClient client;
    //startWIFI();
    pulseCount = 0;
    flowRate = 0.0;
    rainmmhr = 0.0;
    flowMilliLitres = 0;
    totalMilliLitres = 0;
    oldTime = 0;
    //digitalWrite(buttonPin, HIGH);
    attachInterrupt(sensorInterrupt, pulseCounter, RISING);
}
void AM2301_setup() {
  Serial.begin(115200);
  // Initialize device.
  dht.begin();
  Serial.println("DHTxx Unified Sensor Example");
  // Print temperature sensor details.
  sensor_t sensor;
  dht.temperature().getSensor(&sensor);
  Serial.println("------------------------------------");
  Serial.println("Temperature");
  Serial.print  ("Sensor:       "); Serial.println(sensor.name);
  Serial.print  ("Driver Ver:   "); Serial.println(sensor.version);
  Serial.print  ("Unique ID:    "); Serial.println(sensor.sensor_id);
  Serial.print  ("Max Value:    "); Serial.print(sensor.max_value); Serial.println(" *C");
  Serial.print  ("Min Value:    "); Serial.print(sensor.min_value); Serial.println(" *C");
  Serial.print  ("Resolution:   "); Serial.print(sensor.resolution); Serial.println(" *C");
  Serial.println("------------------------------------");
  // Print humidity sensor details.
  dht.humidity().getSensor(&sensor);
  Serial.println("------------------------------------");
  Serial.println("Humidity");
  Serial.print  ("Sensor:       "); Serial.println(sensor.name);
  Serial.print  ("Driver Ver:   "); Serial.println(sensor.version);
  Serial.print  ("Unique ID:    "); Serial.println(sensor.sensor_id);
  Serial.print  ("Max Value:    "); Serial.print(sensor.max_value); Serial.println("%");
  Serial.print  ("Min Value:    "); Serial.print(sensor.min_value); Serial.println("%");
  Serial.print  ("Resolution:   "); Serial.print(sensor.resolution); Serial.println("%");
  Serial.println("------------------------------------");
  // Set delay between sensor readings based on sensor details.
  delayMS = sensor.min_delay / 1000;
}
// Main setup ========
void setup()
{
    Serial.begin(115200);
    rain_sensor_setup();
    AM2301_setup();
    delay(100);
    // We start by connecting to a WiFi network
    Serial.println();
    Serial.println();
    Serial.print("Connecting to ");
    Serial.println(ssid);
    WiFi.begin(ssid, password);
    while (WiFi.status() != WL_CONNECTED) {
        delay(500);
        Serial.print(".");
    }
    Serial.println("");
    Serial.println("WiFi connected");
    Serial.println("IP address: ");
    Serial.println(WiFi.localIP());
}
int value = 0;
void loop()
{
    delay(100);
    rain_sensor_loop();
    AM2301_loop();
//    scanSensor_Box_Temperature();
    //data1 = vTemperature;
    ++value;
    data1 = temp_0;
    data2 = humid_0;
    data3 = flowRate;
    data4 = rainmmhr;
    data5 = flowMilliLitres;
    Serial.print("connecting to ");
    Serial.println(host);
    // Use WiFiClient class to create TCP connections
    WiFiClient client;
    const int httpPort = 80;
    if (!client.connect(host, httpPort)) {
        Serial.println("connection failed");
        return;
    }
    // We now create a URI for the request
     String url = "/api/insertData?device_id=" + String(dID)+"&code="+String(code)+"&data1=" +String(data1) +"&data2="
   + String(data2)+"&data3=" +String(data3)+"&data4=" +String(data4)+"&data5=" +String(data5)
   +"&data6=" +String(data6)+"&data7=" +String(data7)+"&data8=" +String(data8)+"&data9=" +String(data9)
   +"&data10=" +String(data10)+"&data11=" +String(data11)+"&data12=" +String(data12)+"&data13=" +String(data13)
   +"&data14=" +String(data14)+"&data15=" +String(data15)+"&data16=" +String(data16)+"&data17=" +String(data17)
   +"&data18=" +String(data18)+"&data19=" +String(data19)+"&data20=" +String(data20);
    Serial.print("Requesting URL: ");
    Serial.println(url);
    // This will send the request to the server
    client.print(String("GET ") + url + " HTTP/1.1\r\n" +
                 "Host: " + host + "\r\n" +
                 "Connection: close\r\n\r\n");
    //unsigned long timeout = millis();
    delay(1000);
    while (client.available() == 0) {
       /* if (millis() - timeout > 5000) {*/
            Serial.println(">>> Client Timeout !");
            client.stop();
            return;
       /* }*/
    }
    // Read all the lines of the reply from server and print them to Serial
    while(client.available()) {
        String line = client.readStringUntil('\r');
        //Serial.print(line);
    }
    Serial.println();
    Serial.println("closing connection");
    delay(100);
}
//====
void AM2301_loop() {
  // Delay between measurements.
  delay(delayMS);
  // Get temperature event and print its value.
  sensors_event_t event;
  dht.temperature().getEvent(&event);
  if (isnan(event.temperature)) {
    Serial.println("Error reading temperature!");
  }
  else {
    Serial.print("Temperature: ");
    Serial.print(event.temperature);
    Serial.println(" *C");
    temp_0 = event.temperature;
  }
  // Get humidity event and print its value.
  dht.humidity().getEvent(&event);
  if (isnan(event.relative_humidity)) {
    Serial.println("Error reading humidity!");
  }
  else {
    Serial.print("Humidity: ");
    Serial.print(event.relative_humidity);
    Serial.println("%");
    humid_0 = event.relative_humidity;
  }
}
void rain_sensor_loop() {
    if (WiFi.status() == WL_CONNECTED && (millis() - oldTime) > 1000) // Only process counters once per second
    {
        // Disable the interrupt while calculating flow rate and sending the value to
        // the host
        detachInterrupt(sensorInterrupt);
        // Because this loop may not complete in exactly 1 second intervals we calculate
        // the number of milliseconds that have passed since the last execution and use
        // that to scale the output. We also apply the calibrationFactor to scale the output
        // based on the number of pulses per second per units of measure (litres/minute in
        // this case) coming from the sensor.
        flowRate = ((1000.0 / (millis() - oldTime)) * pulseCount) / calibrationFactor;
        rainmmhr = flowRate*1000/(3.14*(cd*cd))*60;  // แปลงเป็น  mm ใน 1 ชม.
        // Note the time this processing pass was executed. Note that because we've
        // disabled interrupts the millis() function won't actually be incrementing right
        // at this point, but it will still return the value it was set to just before
        // interrupts went away.
        oldTime = millis();
        // Divide the flow rate in litres/minute by 60 to determine how many litres have
        // passed through the sensor in this 1 second interval, then multiply by 1000 to
        // convert to millilitres.
        flowMilliLitres = (flowRate / 60) * 1000;
        // Add the millilitres passed in this second to the cumulative total
        totalMilliLitres += flowMilliLitres;
        unsigned int frac;
        // Print the flow rate for this second in litres / minute
        Serial.print("Flow rate: ");
        Serial.print(int(flowRate)); // Print the integer part of the variable
        Serial.print("."); // Print the decimal point
        // Determine the fractional part. The 10 multiplier gives us 1 decimal place.
        frac = (flowRate - int(flowRate)) * 10;
        Serial.print(frac, DEC); // Print the fractional part of the variable
        Serial.print("L/min");
        // Print the number of litres flowed in this second
        Serial.print("  Current Liquid Flowing: "); // Output separator
        Serial.print(flowMilliLitres);
        Serial.print("mL/Sec");
        // Print the cumulative total of litres flowed since starting
        Serial.print("  Output Liquid Quantity: "); // Output separator
        Serial.print(totalMilliLitres);
        Serial.println("mL");
        // Reset the pulse counter so we can start incrementing again
        pulseCount = 0;
        // Enable the interrupt again now that we've finished sending output
        attachInterrupt(sensorInterrupt, pulseCounter, FALLING);
    } else if (WiFi.status() != WL_CONNECTED) {
       // startWIFI();
    }
}
/*
Insterrupt Service Routine
 */
void pulseCounter() {
    // Increment the pulse counter
    pulseCount++;
}
/*
void startWIFI(void) {
    digitalWrite(ledPin, HIGH);   // turn the LED on (HIGH is the voltage level)
    delay(100);
    WiFi.begin(ssid, password); // Connect to the network
    Serial.print("Connecting to ");
    Serial.print(ssid);
    Serial.println(" ...");
    oldTime = 0;
    int i = 0;
    digitalWrite(ledPin, LOW);    // turn the LED off by making the voltage LOW
    delay(100);
    while (WiFi.status() != WL_CONNECTED) { // Wait for the Wi-Fi to connect
        digitalWrite(ledPin, HIGH);   // turn the LED on (HIGH is the voltage level)
        delay(2000);
        Serial.print(++i);
        Serial.print('.');
        digitalWrite(ledPin, LOW);    // turn the LED off by making the voltage LOW
        delay(100);
    }
    delay(2000);
    Serial.print('\n');
    Serial.print("Connection established!");
    Serial.print("IP address:\t");
    Serial.print(WiFi.localIP()); // Send the IP address of the ESP8266 to the computer
}
*/
ว่าแล้วก็ลองยกอุปกรณ์ไปวางกลางหาว เพื่อรับน้ำฝนได้เต็มที่ ส่วนการสอบเทียบค่าเดี่ยวมาว่ากันอีก
ขอบคุณตามลิงก์ครับ https://gist.github.com/klanjabrik/367d7d370f27703425e7a77475b18b16
ลำดับต่อไป ก็มาหา เครื่องวัดความเร็วลม ทิศทางลม ก็จะครบเรื่อง เรื่อง การวัดอากาศ เข้าสู่ระบบการพยากรณ์น้ำท่วม