ทดลองเชื่อมต่อ Server และใช้ RTC บน Controllino
วันนี้มาทดลองทำการเชื่อมต่อ Controllino เข้ากับ Internet ผ่านทาง Ethernet Port และทำการส่งข้อมูลทุก ๆ 5 นาที หรือทุก 1 หรือ 10 นาที ที่จะต้ังได้ด้วยค่าตัวแปร post_duration
โค้ดชุดนี้ เป็นโค้ดเดิมจากการ Data logger ไปสู่ Server และ MySQL database และเคยเชื่อมต่ออุปกรณ์พื้นฐานต่างๆ เช่น LCD, PZEM power, ต่างๆ เลยยังคงเก็บ การ include library ต่างๆ ไว้เช่นเดิม และดูมันจะรกๆ ซักหน่อย แต่ ไลบลารีที่จำเป็นสำหรับตัวอย่างนี้คือ
#include <SPI.h> และ #include<Controllino.h>
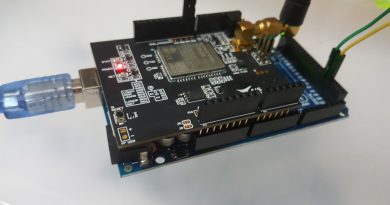
และทำการเอา Controllino ยึดรางลงกล่องกันก่อน ตามรูป พร้อมต่อสาย Lan และ Power Supply 12 Vdc


และขออธิบายเพิ่มเติมจากโค้ดก่อน เฉพาะส่วนที่เกี่ยวข้องกับ controllino
……..
int New_post_time = 0; // กำหนดตัวแปรสำหรับตรวจเวลารอบหใม่
int post_time = 0; // กำหนดตัวแปรสำหรับการบันทึกข้อมูลครั้งก่อน
int Time_check = 0; // กำหนดตัวแปรสำหรับเช็คระยะห่างของเวลา
int post_duration = 5; // กำหนดเวลาการโพสต์ ทุก ๆ 5 นาที
…….
และ ในส่วนของการเช็คเวลาว่าจะทำการบันทึกข้อมูลทุก ๆ 5 นาที
…..
Serial.print(“Minute: “); ส่วนนี้เอาไว้เชคทางพอร์ต serial ว่าเป็นเวลาที่นาทีที่เท่าไหร่
New_post_time = Controllino_GetMinute(); เป็นการกำหนดตัวแปรเวลาใหม่ คือเวลาเป็นนาทีที่ได้จากระบบ RTC ของ controllino
Serial.println(New_post_time); แสดงเวลาค่าใหม่
Time_check = New_post_time – post_time; ตรวจสอบระยะเวลาห่าง
if(Time_check < 0) หากลบกันแล้วน้อยกว่า 0
{
Time_check = New_post_time+60; // บวกเวลาด้วย 60 หากผลลบน้อยกว่า 0 หมายถึงขี้นรอบ ชั่วโมงใหม่
Time_check = Time_check – post_time; //เช็คระยะห่างเวลา
}
Serial.print(“Minute: “); Serial.println(Time_check); //
if (Time_check < post_duration) –> หากยังไม่ครบช่วงเวลาที่กำหนด
{
Serial.println(“No posting….”); –> ก็ไม่ดำเนินการอะไร
delay(1000);
}
else –> หากครบกำหนด 5 นาที
{
Serial.println(“Continue millis()…”); –> ของเก่าลืมลบออก
saveSystemStatusToServer(); –> ทำการเรียกฟังก์ชั่นส่งไป server
post_time = Controllino_GetMinute(); // เวลาเป็นนาที ที่บันทึกข้อมูลครั้งก่อน
}
………..
จากการทดลองรันโค้ด ก็พบว่าระบบจะทำการบันทึกข้อมูลได้อย่างมีเสถียรภาพ ไม่ต้องกังวลเรื่องปัญหา millis() overflow และไม่ต้องติดตั้ง RTC DS3231 จึงเป็นการสร้างงานที่มีเสถียรภาพมากขึ้น
ไว้คราวหน้าเราจะมาทดสอบต่อ Sensor ต่างๆ เข้ากับ Controllino และส่งข้อมูลไปเก็บ และออก แอพมือถือ พร้อมควบคุมการทำงานได้อย่างง่ายดาย
สวัสดีครับ
/*Revision note
 * Controllino MEGA with Ethernet-Core with Realtime
 * Version 1.0 Date July 17,2019
 * Paipat Samanchuen
 *
 */
#include <SPI.h>  // must include SPI.h before Controllino.h
#include <Controllino.h>
#include <SD.h>  // Datalogger on Ehthernet Shield 10/8/2018 Paipat
#include <Ethernet.h>
#include <Wire.h>
#include <LCD.h>
#include <LiquidCrystal_I2C.h>
#include <LiquidCrystal.h>
#include "DHT.h"  // temperature sensor
#include <PZEM004T.h>  // Energy meter Through Serial 3 on Mega
#include <SoftwareSerial.h>  //
#include <ArduinoJson.h>
#include <NTPClient.h>
#include <Arduino.h>
#include "RTClib.h"
#include <Adafruit_GFX.h>
float flowfactor;
/// Pin for Manual Auto Raspberry Pi and cooling fan //
#define FanPin 25 //
#define RaspberryPin 23
#define ManualModePin 38
#define AutoModePin 39
#define DHTPIN 36
#define DHTTYPE DHT11
DHT dht(DHTPIN, DHTTYPE);
//////
////////// Auto Manual Mode  ////////
int AutoMode = 0;
///// Set time for posting tp server ///
int New_post_time = 0; // กำหนดตัวแปรสำหรับตรวจเวลารอบหใม่
int post_time = 0; // กำหนดตัวแปรสำหรับการบันทึกข้อมูลครั้งก่อน
int Time_check = 0; // กำหนดตัวแปรสำหรับเช็คระยะห่างของเวลา
int post_duration = 5;  // กำหนดเวลาการโพสต์  ทุก ๆ 5 นาที
/////
/////////// Ethernet Shield //////////////////////////////////////
// Enter a MAC address for your controller below.
// Newer Ethernet shields have a MAC address printed on a sticker on the shield
byte mac[] = {0xDE, 0xAD, 0xBE, 0xEF, 0xFE, 0xED};
// fill in an available IP address on your network here,
// for manual configuration:
IPAddress ip2(192, 168, 1, 176);  // set ip2 192,168,1,176  for Ethernet shield
// fill in your Domain Name Server address here:
IPAddress myDns(1, 1, 1, 1);
// initialize the library instance:
// with the IP address and port of the server
// that you want to connect to (port 80 is default for HTTP):
EthernetClient client;
const char* host = "xxxxxxx.com";
/////////////////////// end ethernet shield /////
//// next LCD initial /////
LiquidCrystal_I2C lcd(0x27,2,1,0,4,5,6,7,3,POSITIVE);
float LCDDisplayPeriod = 2000;
float LastLCDDisplay;
float ThisLCDDisplay;
//// energy meter setup ///
PZEM004T pzem(&Serial3);  // Serial Rx3,TX3 on ATMega  energy meter
IPAddress ip(192,168,1,171);  // ip for pzem unit  192,168,1,175
bool pzemrdy = false;
/// end PZEM ////
/// prepare host url  ////
String url;   // ใช้สำหรับ โปรแกรมส่วนการส่ง
int count = 0;
int httpPort = 80;
float flow55 = 0;
////
const int chipSelect = 4;
/// control panel condition ////
String panelstate   = "OFF";
float vHumidity = 0;
float vTemperature = 0;
float data1=33;
float data2=33;
float data3=33;
float data4=33;
float data5=33;
float data6=33;
float data7=33;
float data8=33;
float data9=33;
float data10=33;
float data11=33;
float data12=33;
float data13=33;
float data14=33;
float data15=33;
float data16=33;
float data17=33;
float data18=33;
float data19=33;
float data20=33;
///////////////////////////////////////////////////////////////////////////
void setup()
{
  String BCS = "On";
  setup_Controllino_RTC();
  setup_Display();
  setup_PinMode();
  setup_SerialCommunication();
  setup_NetworkConnection();
  setup_DataLogger();
  setup_Sensor_Box_Temperature();
}
void setup_Controllino_RTC()
{
  Controllino_RTC_init();  // ฟังก์ชั่นการใช้เวลาของ controllino
  /* set time and date by separate values values to the RTC chip */
  /* Day, WeekDay, Month, Year, Hour, Minute, Second); */
  Controllino_SetTimeDate(12,4,1,17,15,41,23);
  /* or use another possibility and define the time and date by strings, e.g. "Nov 15 2018", "11:41:02" */
  /* following example uses predefined C macros __DATE__ and __TIME__ which represent compilation time */
  Controllino_SetTimeDateStrings(__DATE__, __TIME__); /* set compilation time to the RTC chip */
}
//////////////////////////////////////// End SETUP  ///////////////////////////
void(* resetFunc) (void) = 0;
void setup_Display()
{
  lcd.begin(20,4);
  lcd.setCursor(0,0);
  lcd.print("IOT by ");
  lcd.setCursor(0,2);
  lcd.print("Samong Thailand");
  lcd.setCursor(0,3);
  lcd.print("  Tel. 091-6982616");
  delay(1000);
}
void setup_PinMode()
{
  pinMode(FanPin,OUTPUT);
  pinMode(RaspberryPin,OUTPUT); // pin 23
  pinMode(ManualModePin,INPUT);  // ขาวัดโหมด manual  pin 38
  pinMode(AutoModePin,INPUT); // ขาวัดโหมด Auto  pin 39
}
void setup_SerialCommunication()
{
// Open serial communications and wait for port to open:
   Serial.begin(115200);
//   mySerial.begin(115200);
}
void setup_NetworkConnection()
{
  // give the ethernet module time to boot up:
  delay(1000);
  // start the Ethernet connection using a fixed IP address and DNS server:
  Ethernet.begin(mac, ip2, myDns);
  // print the Ethernet board/shield's IP address:
  Serial.print("My IP address: ");
  Serial.println(Ethernet.localIP());
  EthernetClient Client;
}
void setup_DataLogger()
{
}
void setup_Sensor_Box_Temperature()
{
  dht.begin();
}
//อ่านสถานะมาเก็บไว้ในตัวแปร
void scanSensor_Flowrate()
{
  //ใช้เป็น Interrupt แทน
}
void scanSensor_Box_Temperature()
{
}
void scanAllSensor()
{
//  scanSensor_Energy();
  scanSensor_Box_Temperature();
}
//แสดงสถานะการทำงานของระบบ
void displayToLCD_Title()
{
}
void displayToLCD_WorkMode()
{
  lcd.clear();
  lcd.begin(20,4);
  lcd.backlight();
  lcd.setCursor(0,0);
  lcd.print("Control Panel check");
  lcd.setCursor(0,2);
  lcd.print("Mode    :");
  lcd.setCursor(10,2);
  lcd.setCursor(0,3);
  lcd.print("Temp 'c :");
  lcd.setCursor(10,3);
}
void displayToLCD_Energy()
{
}
void displayToLCD_All_PumpStatus()
{
  lcd.clear();
  lcd.begin(20,4);
  lcd.backlight();
  lcd.setCursor(0,0);
  lcd.print("Pump Status");
}
void displayToLCD_Flowrate()
{
  lcd.clear();
  lcd.begin(20,4);
  lcd.backlight();
  lcd.setCursor(0,0);
  lcd.print("Flow rate L/MIN");
  lcd.setCursor(0,3);
  lcd.print("Total Flow : ");
  lcd.setCursor(14,3);
}
void displayToLCD_Flowrate5()
{
}
void displayToLCD_pH_EC_A()
{
  lcd.clear();
  lcd.setCursor(0,0);
  lcd.print("Tamod Station");
  lcd.setCursor(0,1);
  lcd.print(" pH         : ");
  lcd.setCursor(0,2);
  lcd.print(" EC  us/cm  : ");
  lcd.setCursor(0,3);
  lcd.print(" Temp 'c    : ");
  lcd.setCursor(14,1);
  lcd.setCursor(14,3);
//  lcd.print(temperature);
}
void displayToLCD_pH_EC_B()
{
}
void displayToLCD_Inlet_Outlet()
{
  lcd.clear();
  lcd.setCursor(0,0);
  lcd.print("        inlet outlet");
  lcd.setCursor(0,1);
  lcd.print("pH    : ");
  lcd.setCursor(0,2);
  lcd.print("EC    : ");
  lcd.setCursor(0,3);
  lcd.print("Flow  : ");
  lcd.setCursor(9,1);
  lcd.print("#na");
  lcd.setCursor(9,2);
  lcd.print("#na");
  lcd.setCursor(9,3);
  lcd.print("#na");
}
void displayToLCD_TankLevel()
{
  lcd.clear();
  lcd.begin(20,4);
  lcd.backlight();
  lcd.setCursor(0,0);
  lcd.print("Tank Level");
  lcd.setCursor(0,1);
  lcd.print("T#0:");
}
void displayToLCD_All_aNodeVoltage()
{
  lcd.clear();
  lcd.setCursor(0,0);
  lcd.print(" Cell Voltage (mV)");
  lcd.setCursor(0,1);
  lcd.print("R1 : ");
  lcd.setCursor(0,2);
  lcd.print("R2 : ");
  lcd.setCursor(0,3);
  lcd.print("R3 : ");
  lcd.setCursor(11,1);
  lcd.print("R4 : ");
  lcd.setCursor(11,2);
  lcd.print("R5 : ");
}
void displayToSerial_Title()
{
}
void displayToSerial_WorkMode()
{
  Serial.println(" Mode check : ");
  Serial.print("Manual mode switch :");
//  Serial.println(ManualModePinValue);
  Serial.print("Automode switch  : ");
//  Serial.println(AutoModePinValue);
  Serial.print("Mode Select  ");
//  Serial.println(Modeselect);
}
void displayToSerial_Energy()
{
}
void displayToSerial_Flowrate()
{
}
void displayToSerial_pH_EC_A()
{
}
void displayToSerial_pH_EC_B()
{
}
void displayToSerial_Inlet_Outlet()
{
}
void displayToSerial_CalculateFlow()
{
}
void displayToSerial_PumpStatus()
{
}
void displayToSerial_TankLevel()
{
}
void displayAllSystemStatus()
{
  displayAllSystemStatusToLCD();
  displayAllSystemStatusToSerial();
}
void displayAllSystemStatusToLCD()
{
  int timeA = 4000;
  displayToLCD_Title(); delay(timeA);
  displayToLCD_Energy(); delay(timeA);
  displayToLCD_All_PumpStatus(); delay(timeA);
  displayToLCD_Flowrate(); delay(timeA);
  displayToLCD_Flowrate5(); delay(timeA);
  displayToLCD_pH_EC_A(); delay(timeA);
 // displayToLCD_pH_EC_B();
  displayToLCD_Inlet_Outlet();
  displayToLCD_TankLevel(); delay(timeA);
  displayToLCD_All_aNodeVoltage(); delay(timeA);
}
void displayAllSystemStatusToSerial()
{
}
void saveSystemStatusToServer()
{
    /////  prepare variable of data for upload to server //////
   String url = "/iot/api/insertData?device_id=" + String(1)+"&data1=" +String(data1) +"&data2="
   + String(data2)+"&data3=" +String(data3)+"&data4=" +String(data4)+"&data5=" +String(data5)
   +"&data6=" +String(data6)+"&data7=" +String(data7)+"&data8=" +String(data8)+"&data9=" +String(data9)
   +"&data10=" +String(data10)+"&data11=" +String(data11)+"&data12=" +String(data12)+"&data13=" +String(data13)
   +"&data14=" +String(data14)+"&data15=" +String(data15)+"&data16=" +String(data16)+"&data17=" +String(data17)
   +"&data18=" +String(data18)+"&data19=" +String(data19)+"&data20=" +String(data20);
 /*
   String url = "/api/weather/insert.php?phinlet=" + String(0) + "&AlarmMessage0=" + String(0);
   */
   Serial.print("Resquesting URL: ");
   Serial.println(url);
    delay(1000);
      // if there's a successful connection:
    //EthernetClient client;
    delay(1000);
    /*if (millis() - lastConnectionTime > postingInterval)
    {
    */
      if (client.connect(host, 80))
        {
           Serial.println("Data submitting to server  ... waiting...");
           client.println(String("GET ") + url + " HTTP/1.1\r\n" +
                         "Host: " + host + "\r\n" +
                         "Connection: close\r\n\r\n");
           //client.println("Connection: close");
           Serial.println("Data saved completed..");
        }
        else
        {
          // if you couldn't make a connection:
          Serial.println("connection failed 2 ");
        }
        while(client.available())
              {
              String line = client.readStringUntil('\r');
              Serial.print(line);
              }
    /*
     }
     */
    client.stop();
    Serial.println("closing connection");
}
///////////////////////////////////////////////////////////////
///////////////////////////////////////////////////////////////
void loop()
{
  runSystem();   //ระบบเริ่มทำงาน
  /// get time
  Serial.print("Minute: "); New_post_time = Controllino_GetMinute(); Serial.println(New_post_time);
  Time_check = New_post_time - post_time;
  if(Time_check < 0)
  {
    Time_check = New_post_time+60;  // บวกเวลาด้วย 60 หากผลลบน้อยกว่า 0 หมายถึงขี้นรอบ  ชั่วโมงใหม่
    Time_check = Time_check - post_time; //เช็คระยะห่างเวลา
  }
  Serial.print("Minute: ");
  Serial.println(Time_check);
  //
  if (Time_check < post_duration)
  {
  Serial.println("No posting....");
  delay(1000);
  //resetFunc();
  }
  else
  {
  Serial.println("Continue millis()...");
  saveSystemStatusToServer();
  post_time = Controllino_GetMinute();  // เวลาเป็นนาที  ที่บันทึกข้อมูลครั้งก่อน
  }
}
//////////////////////////////////////  end loop  /////////
///////////////////////////////////////////////////////////
void runSystem()
{
}
//////////////////////////////////////////////////////////////
//////////////////////////////////////////////////////////////
void initializeAllSensorStatus()
{
  initializeSensorStatus_Energy();
  initializeSensorStatus_Flowrate();
  initializeSensorStatus_pH();
  initializeSensorStatus_EC();
}
void initializeSensorStatus_Energy()
{
}
void initializeSensorStatus_Flowrate()
{
}
void initializeSensorStatus_pH()
{
}
void initializeSensorStatus_EC()
{
}
void runMode_Auto()
{
  doModeAuto_Start();
  doModeAuto_Operate();
  doModeAuto_Complete();
}
void doModeAuto_Start()
{
  initializeAllSensorStatus();
}
void doModeAuto_Operate()
{
//  readControlCommandFromServer();
  scanAllSensor();
  displayAllSystemStatus();
//  saveSystemStatusToDataLogger();
  saveSystemStatusToServer();
//  resetAlarmMessage();
}
void doModeAuto_Complete()
{
}
void doModeManual_Start()
{
  initializeAllSensorStatus();
}
void doModeManual_Operate()
{
  scanAllSensor();
  displayAllSystemStatus();
//  saveSystemStatusToDataLogger();
  saveSystemStatusToServer();
}
void doModeManual_Complete()
{
}
void runMode_Manual()
{
  doModeManual_Start();
  doModeManual_Operate();
  doModeManual_Complete();
}
void runMode_Off()
{
   doModeOff_Start();
   doModeOff_Operate();
   doModeOff_Complete();
}
void doModeOff_Start()
{
  initializeAllSensorStatus();
}
void doModeOff_Operate()
{
  scanAllSensor();
  displayAllSystemStatus();
//  saveSystemStatusToDataLogger();
  saveSystemStatusToServer();
}
void doModeOff_Complete()
{
  displayAllSystemStatus();
}
/////////////////////////// end  /////////////
void SwitchOnRaspberryPi()
{
  digitalWrite(RaspberryPin,LOW);
}