ประกอบร่าง ESP32-Nano-I2C เป็น datalogger อย่างเซียน ตอนที่ 4 – รวมร่างซะที
มาถึงตอนที่ 4 กันด้วยการรวมร่างทุกองค์ประกอบเข้าด้วยกัน และมาดูโค้ดในส่วนของ ESP32 ที่ทำหน้าที่เป็น Master ที่จะส่งคำขอไปรับข้อมูลจาก Slave ATMega , Nao และส่งค่าไปแสดงที่ LCD16x2
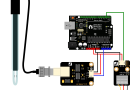
แสดงภาพการเชื่อมต่อด้วย Fritze ดังรูป

// ESP32  SDA = GIO21 , SCL = GIO22
/////////////////////////////////////////////////////////////////////////////
/////////////////////////////////////////////////////////////////////////////
//Libraries
#include <Wire.h>
#include <LiquidCrystal_I2C.h>
#include <WiFi.h>
//======
LiquidCrystal_I2C lcd(0x27,16,2);  // Set the LCD I2C address, if it's not working try 0x27.
// Define Slave I2C Address
#define SLAVE_ADDR 24  // LCD = 39, data port = 24
#define SLAVE_ADDR_AM 27 // Ammonis sensor
// Define Slave answer size
#define ANSWERSIZE 4  // หากรับมาเกิน 5 จะไม่สามารถส่งขึ้น server ได้
#define ANSWERSIZE_AM 4
////
char* host = "xxxxxxx.com";
char* code = "xxxxx";
char* dID = "xxx";
float dustDensity = 35;
String response ="0";
String response_c = "0";
float tempF_0 = 0;
float humid_0 = 0;
float vHumidity = 0;
float vTemperature = 0;
String data1 ;
String data2 ; // standard
float data3 = 0;
float data4 = 0;
float data5 = 0;
float data6 = 0;
float data7 = 0;
float data8 = 0;
float data9 = 0;
float data10 = 0;
float data11 = 0;
float data12 = 0;
float data13 = 0;
float data14 = 0;
float data15 = 0;
float data16 = 0;
float data17 = 0;
float data18 = 0;
float data19 = 0;
float data20 = 0;
float temperatureC = 0;
float temperatureF = 0;
/////////////////////////////////////////////////////////////////////////////
void master_i2c_setup() {
  // Initialize I2C communications as Master
  Wire.begin();
  // Setup serial monitor
  Serial.println("I2C Master Demonstration");
}
/////////////////////////////////////////////////////////////////////////////
// Arduino setup function.
///////////////
//char* ssid     = "Arsenal2019_2.4G";
//char* password = "xxxxxxxxx";
const char* ssid     = "dlink_DWR-932C_0C4E";
const char* password = "xxxxxxx";
//const char* ssid     = "AndroidAP";
//const char* password = "xxxxxx";
//const char* ssid     = "AndroidAP-J7";
//const char* password = "xxxxxxxx";
// Helper functions to print a data value to the serial monitor.
void WiFisetup()
{
  Serial.println();
  Serial.print("Connecting to ");
  Serial.println(ssid);
  WiFi.begin(ssid, password);
  delay(500);
  if (WiFi.status() != WL_CONNECTED) {
    delay(500);
    Serial.print("Failed to connected and WiFi setup ");
  }
  else{
  Serial.println("");
  Serial.println("WiFi connected OK");
  Serial.println("IP address: ");
  Serial.println(WiFi.localIP());
  }
}
void LCDsetup()
{
Serial.begin(9600);
  lcd.init();
  lcd.backlight();
  lcd.setCursor(0,0);
  lcd.print("Save the World");
  lcd.setCursor(0,1);
  lcd.print("PM2.5-NH3 Online");
  delay(500);
  lcd.clear();
  lcd.setCursor(0,0);
  lcd.print("Max := 100 ");
  lcd.setCursor(0,1);
  lcd.print("TFER Engineering");
}
void setup()
{
  Serial.begin(9600);
  LCDsetup();
  master_i2c_setup();
  delay(10);
  // We start by connecting to a WiFi network
  Serial.println();
  Serial.print("Connecting to ");
  Serial.println(ssid);
  WiFi.begin(ssid, password);
  delay(500);
  if (WiFi.status() != WL_CONNECTED) {
    delay(500);
    Serial.print("Failed connected setup ");
  }
  else{
  Serial.println("");
  Serial.println("WiFi OK connected");
  Serial.println("IP address: ");
  Serial.println(WiFi.localIP());
  // We start by connecting to a WiFi network
  }
}
int value = 0;
void serverloop()
{
    //delay(1000);
     ++value;
    data1 = String(data1);
    data2 = String(data2);
    Serial.print("data1 = ");Serial.println(data1);
    Serial.print("data2 = ");Serial.println(data2);
    Serial.print("connecting to ");
    Serial.println(host);
    // Use WiFiClient class to create TCP connections
    WiFiClient client;
    const int httpPort = 80;
    if (!client.connect(host, httpPort)) {
        Serial.println("connection failed");
        return;
    }
    // We now create a URI for the request
     String url = "/api/insertData?device_id=" + String(dID)+"&code="+String(code)+"&data1=" +String(data1) +"&data2="
   + String(data2)+"&data3=" +String(data3)+"&data4=" +String(data4)+"&data5=" +String(data5)
   +"&data6=" +String(data6)+"&data7=" +String(data7)+"&data8=" +String(data8)+"&data9=" +String(data9)
   +"&data10=" +String(data10)+"&data11=" +String(data11)+"&data12=" +String(data12)+"&data13=" +String(data13)
   +"&data14=" +String(data14)+"&data15=" +String(data15)+"&data16=" +String(data16)+"&data17=" +String(data17)
   +"&data18=" +String(data18)+"&data19=" +String(data19)+"&data20=" +String(data20);
    Serial.print("Requesting URL: ");
    Serial.println(url);
    // This will send the request to the server
    client.print(String("GET ") + url + " HTTP/1.1\r\n" +
                 "Host: " + host + "\r\n" +
                 "Connection: close\r\n\r\n");
    //unsigned long timeout = millis();
    delay(1000);
    while (client.available() == 0) {
            Serial.println(">>> Client Timeout !");
            client.stop();
            return;
           }
    // Read all the lines of the reply from server and print them to Serial
    while(client.available()) {
        String line = client.readStringUntil('\r');
        //Serial.print(line); // ถอดคอมเม้น? ออก เพื่อดูการตอบสนองจาก Server
    }
    Serial.println();
    Serial.println("endloop server ");
    delay(1000);
}
//====
void loop()
{
  lcd.clear();
  lcd.setCursor(0,0);
  lcd.print("Emergency call:");
  lcd.setCursor(0,1);
  lcd.print("062-60xxxx7");
  delay(500);
//// PM2.5
  lcd.clear();
  lcd.setCursor(0,0);
  lcd.print("PM2.5 (ug/m3)");
  lcd.setCursor(0,1);
  lcd.print("now: ");
  lcd.setCursor(6,1);lcd.print(data1); // แสดงค่า PM2.5 บนจอ LCD
  delay(1000);
// NH3 ppm
  lcd.clear();
  lcd.setCursor(0,0);
  lcd.print("Ammonia-NH3(ppm)");
  lcd.setCursor(0,1);
  lcd.print("now: ");
  lcd.setCursor(6,1);lcd.print(data2); // แสดงค่า แอมโมเนีย บนจอ LCD
  delay(1000);
//////////////
  serverloop();  // ให้ loop server ทำงาน
  data1 = ""; // เสร็จแล้วคืนค่าเป็นค่าว่าง
  data2 = ""; // เสร็จแล้วคืนค่าเป็นค่าว่าง
  //delay(5000);
  master_i2c_loop();  // loop  การรับส่งค่า ผ่านทาง I2C
  Serial.print("Cycle time := ");Serial.println(millis()); // แสดงค่าเวลาที่ละรอบ
}
void master_i2c_loop() {
  //delay(1000);
  response = "";
  Serial.println("Write data to slave");
  // Write a charatre to the Slave
  Wire.beginTransmission(SLAVE_ADDR); // เริ่มทำการส่งค่า
  Wire.write(0); // ส่ง่ค่า low
  Wire.endTransmission(); // สิ้นสุดคำขอ
  Serial.println("Receive data PM2.5 ");
  // Read response from Slave
  // Read back 5 characters
  Wire.requestFrom(SLAVE_ADDR,ANSWERSIZE);  // คำขอจาก slave ตัวที่มี address ตรงกับ ว่าจะส่งข้อมูลเข้ามา  โดยตัวแรกเป็นตัววัดค่าฝุ่น
  // Add characters to string
  while (Wire.available()) {
      char b = Wire.read();  // ค่า  b ที่จะส่งเข้ามาทีละค่า
      response += b; //  แล้วนำมาต่อเรียงกันเป็นค่า response
      data1 = response; // ให้ค่า data1 = response ที่ต่อเรียงกันจาก  b ที่ทะยอยส่งเข้ามา
  }
  // Print to Serial Monitor
  Serial.print("PM 2.5  um/m3 : ");Serial.println(data1);
  Serial.println("");
  //delay(1000);
  ///// start reading ammonia
  response_c = "";
  Serial.println("Write data to slave");
  // Write a charatre to the Slave
  Wire.beginTransmission(SLAVE_ADDR_AM);  // เริ่มติดต่อกับ  slave ที่วัด แอมโมเนีย
  Wire.write(0);
  Wire.endTransmission();
  Serial.println("Receive data Ammonia : ");
  // Read response from Slave
  // Read back 5 characters
  Wire.requestFrom(SLAVE_ADDR_AM,ANSWERSIZE_AM);
  // Add characters to string
  while (Wire.available()) {
      char c = Wire.read();  // อ่านค่าจาก serial port
      response_c += c;  // ต่อค่า c มาเป็น response_c
      data2 = response_c;  // ให้ค่า string ของแอมโมเนียไปกับ data2
  }
  // Print to Serial Monitor
  Serial.print("Ammonia : ");Serial.println(data2);
}
// Main setup ========