ประกอบร่าง ESP32-Nano-I2C เป็น datalogger อย่างเซียน ตอนที่ 3 – ชุดแอมโมเนีย MQ-137
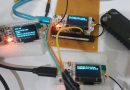
ในตอนนี้เราจะมาจัดการกันในส่วนของตัววัดแอมโฒเนีย ด้วย Sensor MQ-137 หน้าตาตามรูปนี้เลย ราคาตกตัวละ 1,200 – 1,400 บาทแล้วแต่ว่าจะซื้อมาจากที่ไหน
สำหรับแหล่งอ้างอิงตามลิงก์นี้เลย Link
เซนเซอร์ในตระกูล MQ ที่น่าสนใจ
MQ-series Gas sensors
- Carbon Dioxide (CO2) : MG-811
- Carbon Monoxide (CO): MQ-9
- Total Volatile Organic Compounds (TVOCs): CCS811
- Equivalent Carbon Dioxide (eCO2): CCS811
- Metal Oxide (MOX): CCS811
- Ammonia: MQ-137
- Air Quality: MQ-135
- LPG, Alcohol, Smoke: MQ2
โดยเซนเซอร์เหล่านี้มีหลักการทำงานที่คล้ายกัน โดยจะขออธิบายเฉพาะตัว MQ-137 ที่เราจะใช้ในโครงงานนี้


ในกรณีนี้ ผมได้อุปกรณ์มาจากร้าน arduinothai.com
สำหรับหลักการทำงานของ MQ-137 คือ การเปลี่ยนแปลงค่า Vout (Aout) เมื่อมีแกสแอมโมเนียผ่านเซนเซอร์ โดยในตัววัดจะมีขดลวดให้ความร้อน
สำหรับแกสแต่ละชนิดจะให้ค่า Rs/Ro ต่อค่า ppm ที่ต่างกันไป


สำหรับการต่อใช้งานก็ง่ายมาก Aout ต่อไปยัง A0 , Vcc = 5V และต่อ GND ไปยัง GND ของ Nano
จาก datasheet ค่า Ro จะมีค่าระหว่าง 900 – 1400 K-Ohm แต่จากการทดสอบ ค่า Ro ที่เหมาะสมเท่ากับ 600 k-ohm ขณะที่ทำการวัด หากเอามือจับที่ตัวเซนเซอร์จะพบว่ารู้สึกอุ่นๆ อันเป็นผลมาจาก การทำงานของ heater ในเซนเซอร์
ในกการทดสอบด้วยค่า Ro น้อยๆ ต่ำ ๆ ตามที่พบในเอกสารอ้างอิง จะให้ผลค่าวัดออกมาเป็นลบ แต่เมื่อทำการเปลี่ยนค่าสูงขึ้นไปใกล้เคียงกับค่า Ro ใน datasheet พบว่าจะให้ผลลัพธ์ที่สมเหตุสมผล โดยการทดลองไปพร้อมกับเครื่องวัดแกสแบบพกพา และทดสอบง่าย ๆ โดย “แอมโมเนียหอมสหการ” โดบเซนเวอร์ตัวนี้จะมีค่าความสามารถวัดได้ที่ 5 – 200 ppm
สำหรับโปรแกรมของชุดนี้ ที่ใช้งานร่วมกับ Arduino Nano
/////////////////////////////////////////////////////////////////////////////
///*
// * Program to measure gas in ppm using MQ sensor
// * Program by: B.Aswinth Raj
// * Website: www.circuitdigest.com
// * Dated: 28-12-2017
//
// */
// Board Arduino Nano //////////////
#define RL 47  //The value of resistor RL is 47K
#define m -0.263 //Enter calculated Slope
#define b 0.42 //Enter calculated intercept
#define Ro 600 //Enter found Ro value 20 หลังจากทดลองต้องใช้ค่า 600 จึงจะให้ผลลัพธ์ที่ใกล้เคียง
#define MQ_sensor A0 //Sensor is connected to A0
// Choose program options.
//#define PRINT_RAW_DATA
#define USE_AVG
// Include Arduino Wire library for I2C
#include <Wire.h>
//*
//  I2C Slave Demo
//  i2c-slave-demo.ino
//  Demonstrate use of I2C bus
//  Slave receives character from Master and responds
//  DroneBot Workshop 2019
//  https://dronebotworkshop.com
//*/
// Define Slave I2C Address
#define SLAVE_ADDR 27
// Define Slave answer size
#define ANSWERSIZE 5 // หากตั้งเกิน 5 ค่า data ที่ออกไป I2C จะไม่เป็นตัวเลข  จึงส่งขึ้น server ไม่ได้
// Define string with response to Master
float result = 123.45;
String answer ;
//= String(result);
int n = 0;
float ppmtotal = 0;
float NH_Average = 0;
/////////////////////////////////////////////////////////////////////////////
// Arduino setup function.
void setup() {
  // Initialize I2C communications as Slave
  Wire.begin(SLAVE_ADDR); // กำหนดแอดเดรสสำหรับการสื่อสาร  เป็นช่อง  27
  // Function to run when data requested from master
  Wire.onRequest(requestEvent); // เมื่อมีการ request ให้ไปทำงานที่ void  requestEvent()
  // Function to run when data received from master
  Wire.onReceive(receiveEvent); // เมื่อมีการรับจาก master ให้ไปทำงานที่   void receiveEvent()
  // Setup Serial Monitor
  Serial.begin(9600);
  Serial.println("I2C Slave Demonstration");
}
void receiveEvent() {
  // Read while data received
  while (0 < Wire.available()) {
    byte x = Wire.read();
  }
  // Print to Serial Monitor
  Serial.println("Receive event Ammonia ");
}
void requestEvent() {
  // Setup byte variable in the correct size
  byte response[ANSWERSIZE];
  // Format answer as array
  for (byte i=0;i<ANSWERSIZE;i++) {
    response[i] = (byte)answer.charAt(i);
  }
  // Send response back to Master
  Wire.write(response,sizeof(response));
  // Print to Serial Monitor
  Serial.println("Request event Ammonia ");
  n=0;
  ppmtotal = 0;
  NH_Average=0;
}
void loop() {
  float VRL; //Voltage drop across the MQ sensor
  float Rs; //Sensor resistance at gas concentration
  float ratio; //Define variable for ratio
  VRL = analogRead(MQ_sensor)*(5.0/1023.0); //Measure the voltage drop and convert to 0-5V
  Rs = ((5.0*RL)/VRL)-RL; //Use formula to get Rs value
  ratio = Rs/Ro;  // find ratio Rs/Ro
  float ppm = pow(10, ((log10(ratio)-b)/m)); //use formula to calculate ppm
/*
  lcd.setCursor(0,0);
  */
 // Serial.print("NH3 (ppm) = "); //Display a ammonia in ppm
  //Serial.println(ppm);
  //lcd.setCursor(0, 1);   // set the cursor to column 0, line 1
 Serial.print("Voltage = "); //Display a intro message
 Serial.println(VRL);
   delay(1000);
  // lcd.clear(); //Then clean it
  ppmtotal += ppm ;
  n = n+1;
  NH_Average=ppmtotal/n;
  if (NH_Average <0.5)
  NH_Average = 0.00;
  answer=String(NH_Average);
  Serial.print("NH3average(ppm)= "); //Display a ammonia in ppm
  Serial.println(NH_Average);
}
Reference : Link